This guide walks you through a step-by-step search sequence in Google Scholar designed for students at Vector Technology Institute. You will learn how to build effective searches, verify that your sources are peer reviewed, and create accurate APA 7th edition citations for your assignments and research papers.
📎 Before publishing: Upload the five PNG diagram files (svg-step3-search-bar.png, svg-step3-advanced-form.png, svg-step4-5-results.png, svg-step7-citation-chain.png, svg-step8-apa-citation.png) to the WordPress Media Library. Then replace each INSERT-YOUR-UPLOADED-URL below with the base URL of your uploads folder (e.g., https://yourdomain.com/wp-content/uploads/2026/04).
🎯 Quick Overview — The 8-Step Search Sequence
- Define your research question — narrow your topic into a clear, answerable question.
- Extract 2–4 core keywords — pull the essential concepts from your question.
- Build your search string — combine keywords using Boolean operators and quotation marks.
- Run the search in Google Scholar — enter your search string and review the results.
- Apply date filters — limit results to the last 5 years for technology topics.
- Verify peer-review status — confirm that each source is published in a scholarly journal.
- Expand with “Cited By” and “Related Articles” — use strong results to discover additional sources.
- Generate and correct your APA citation — use the citation tool, then manually verify formatting.
Step 1 — Define Your Research Question
Before you open Google Scholar, write a clear research question. A focused question prevents unfocused searching and keeps you on track.
❌ Too broad: “cybersecurity”
❌ Too narrow: “cybersecurity training used at the University of the West Indies computer science department in Fall 2024”
✅ Just right: “How effective is cybersecurity awareness training for university students in the Caribbean?”
A well-formed question contains a population (university students), a context or setting (Caribbean), and a topic or intervention (cybersecurity awareness training). These become your keywords in the next step.
Step 2 — Extract 2–4 Core Keywords
Pull the essential concepts from your research question. These are the building blocks of your search string.
From the example question above:
- Keyword 1: cybersecurity awareness training
- Keyword 2: university students
- Keyword 3: Jamaica or Caribbean
Also think of synonyms and related terms for each keyword. Google Scholar does not automatically match synonyms the way some databases do, so you need to include alternatives yourself.
| Core Keyword | Synonyms / Alternatives |
|---|---|
| cybersecurity awareness training | information security education, cyber hygiene training |
| university students | higher education students, college students, learners |
| Jamaica | Caribbean, West Indies, developing countries |
Step 3 — Build Your Search String with Boolean Operators
Combine your keywords and synonyms into a search string. The operators below tell Google Scholar exactly how to connect your terms.
| Operator | What It Does | Example |
|---|---|---|
| ” “ (Quotation Marks) | Searches for the exact phrase as a unit | "cloud computing security" |
| AND | Requires both terms to appear in the result | "network security" AND Jamaica |
| OR | Accepts either term — useful for synonyms | students OR learners |
| – (minus sign) | Excludes a term from results | "artificial intelligence" -robotics |
| author: | Limits results to a specific author | author:"John Smith" |
| source: | Limits results to a specific journal | source:"IEEE Access" |
✅ Sample search string:
"cybersecurity awareness training" AND (students OR learners) AND (Jamaica OR Caribbean)
This string tells Google Scholar: find results that contain the exact phrase cybersecurity awareness training, that also mention either students or learners, and that reference either Jamaica or the Caribbean.
The diagram below shows where to enter your search string in Google Scholar.
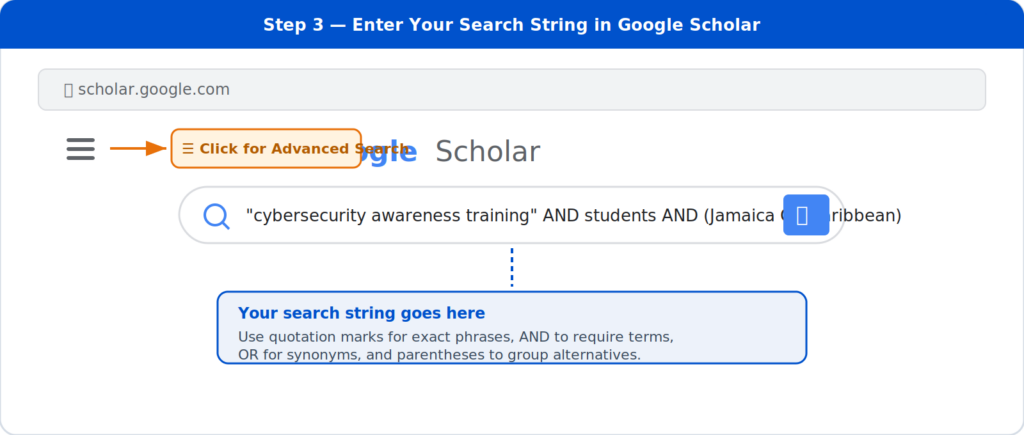
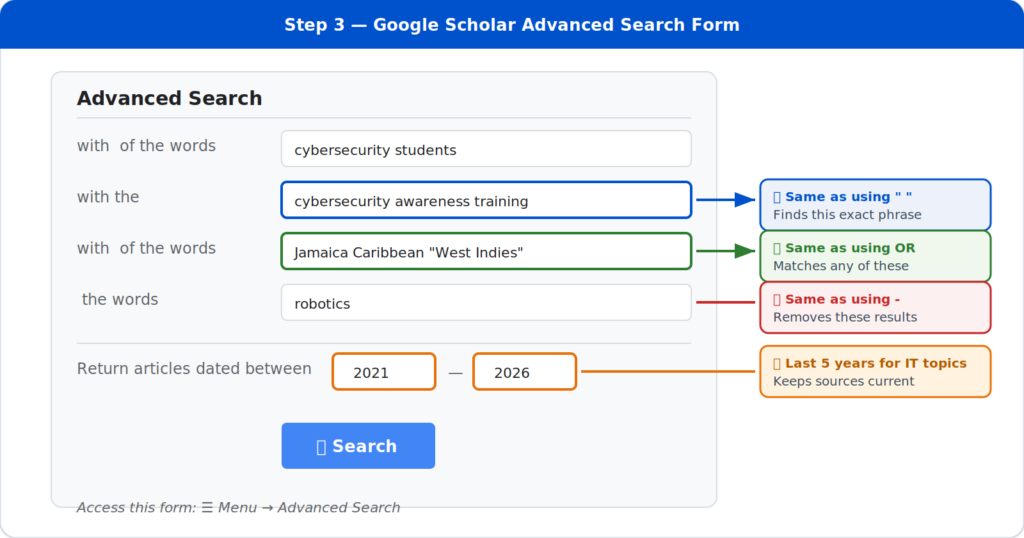
Tip — Use the Advanced Search form: Select the three-line menu icon (☰) in the upper-left corner of Google Scholar, then choose Advanced Search. This form lets you enter exact phrases, optional words, excluded words, and date ranges in separate fields — no need to type Boolean operators yourself.
The diagram below shows the Advanced Search form and how each field maps to a Boolean operator.
Step 4 — Run the Search and Review Results
Enter your search string at scholar.google.com and review the first page of results. For each result, quickly scan:
- Title — Does it clearly relate to your research question?
- Snippet / Abstract — Does it discuss your specific topic or a closely related area?
- Source — Is it from a journal, conference proceeding, or institutional repository?
- Year — Is it recent enough for a technology topic?
If your first search produces too many irrelevant results, return to Step 3 and adjust your string. Add quotation marks around phrases, include a minus sign to remove off-topic terms, or add another AND keyword to narrow the focus. If your search returns too few results, try broader synonyms, remove one keyword, or use OR instead of AND between some terms.
Step 5 — Apply Date Filters
Technology, cybersecurity, and IT topics change quickly. After running your search, use the date filter options on the left side of the Google Scholar results page to limit results.
The diagram below shows the results page layout — the date filter sidebar on the left, the anatomy of a single result in the centre, and the action links at the bottom of each result.
Recommended Date Ranges
- ICT & Cybersecurity: Last 5 years (2021–2026)
- Networking & Cloud: Last 5 years
- Software Engineering: Last 5–7 years
- Business / Management: Last 7–10 years
- Foundational Theory: Any date (seminal works)
How to Filter in Google Scholar
- Click “Since 2021” on the left sidebar
- Or select “Custom range…” to enter specific years
- Click “Sort by date” to see the newest results first
Step 6 — Verify Peer-Review Status
Google Scholar indexes a wide range of sources — journal articles, conference papers, theses, book chapters, preprints, and even some web pages. Not everything in Google Scholar is peer reviewed. You must verify each source before you use it in an academic paper.
⚠️ How to Tell If a Source Is Peer Reviewed
Ask yourself these four questions about every source you plan to cite:
- Is it published in a recognised academic journal? — Look for a journal title in the result (e.g., IEEE Access, Journal of Information Security, Computers & Education). Conference proceedings from reputable organisations such as ACM and IEEE are also peer reviewed.
- Does it include author names, an abstract, a reference list, and a publication year? — Peer-reviewed articles almost always include all four. If any of these are missing, the source may be a preprint, thesis, or non-scholarly document.
- Can you find the journal in a trusted index? — Search for the journal title in the Directory of Open Access Journals (DOAJ), IEEE Xplore, ACM Digital Library, or Scopus Sources. If the journal appears in one of these indexes, it is peer reviewed.
- Does the journal’s website describe its review process? — Most peer-reviewed journals publish an “About” or “Author Guidelines” page that explicitly states articles undergo peer review.
🚫 Red Flags — Sources That Are NOT Peer Reviewed
- Blog posts, news articles, and Wikipedia pages
- Preprints hosted on sites like SSRN or ResearchGate that have not been published in a journal
- Student theses or dissertations (these are reviewed by a committee, not peer reviewed by external experts)
- Articles from journals listed in Beall’s List of Predatory Journals
- Sources that charge authors a fee but have no visible editorial board or review process
Refer back to the results page diagram above (Steps 4 & 5) — the green badges under the result line show the peer-review indicators to look for: scholarly journal title ✔, authors listed ✔, reputable publisher ✔, and recent publication year ✔.
Step 7 — Expand with “Cited By” and “Related Articles”
Once you have found one strong, relevant, peer-reviewed article, use Google Scholar’s built-in discovery tools to find more.
| Tool | What It Does | When to Use It |
|---|---|---|
| Cited by | Shows newer articles that referenced this article in their own reference list | You found a good older article and need newer research that builds on it |
| Related articles | Shows articles on the same topic that share similar references and keywords | You want to explore related angles or compare findings |
| All versions | Shows every available copy of the article, including free PDF versions | The main link is behind a paywall and you need free access |
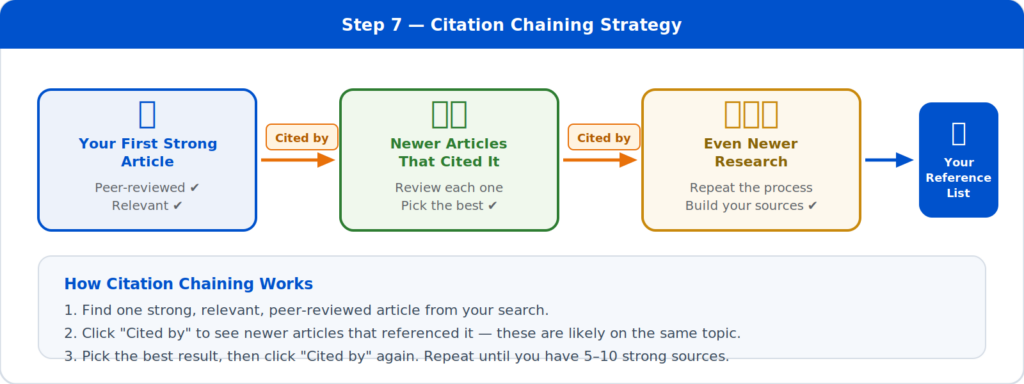
The diagram below illustrates the citation chaining strategy — find one strong article, click “Cited by” to discover newer research, and repeat the process to build your reference list.
Step 8 — Generate and Correct Your APA 7th Edition Citation
Google Scholar provides a built-in citation tool. Under each result, click the quotation mark icon (❝) and choose APA.
⚠️ Do NOT Copy-Paste Without Checking
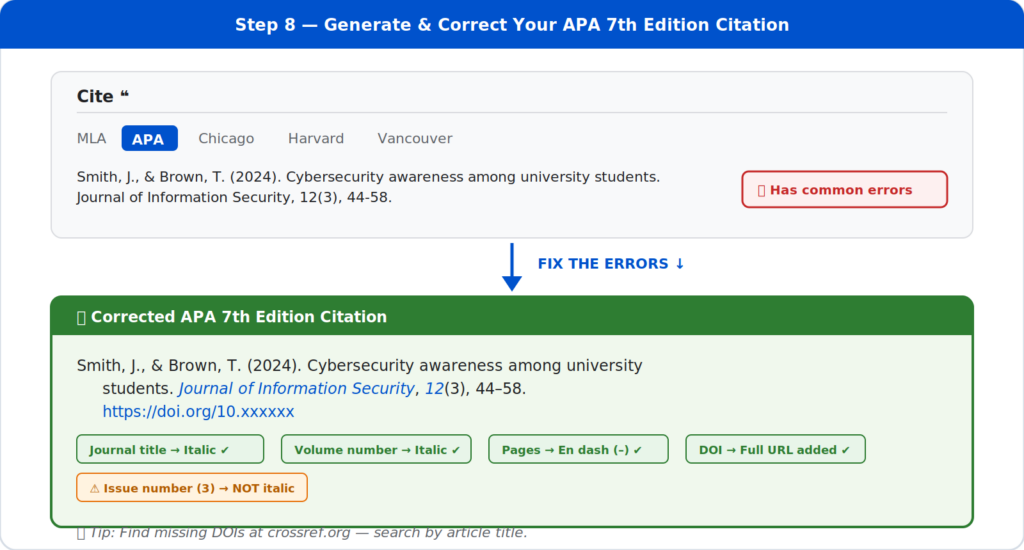
Google Scholar’s auto-generated citations frequently contain errors. You must manually verify every citation before submitting it in an assignment.
The diagram below shows exactly what Google Scholar generates and how to correct it to meet APA 7th edition standards.
APA 7th Edition Checklist for Journal Articles
Use this checklist every time you create a reference list entry for a journal article.
| Element | Rule | Correct Example |
|---|---|---|
| Author names | Last name, First initial. Use & before the final author. | Smith, J., & Brown, T. |
| Year | In parentheses after the author names. | (2024). |
| Article title | Sentence case. No italics. No quotation marks. | Cybersecurity awareness among university students. |
| Journal title | Italicised. Title case. | Journal of Information Security, |
| Volume number | Italicised. | 12 |
| Issue number | Not italicised. In parentheses. | (3), |
| Page range | Use an en dash (–), not a hyphen (-). | 44–58. |
| DOI | Full URL format. No “Retrieved from.” | https://doi.org/10.xxxxxx |
💡 Where to find the DOI: Look on the first page of the article (usually near the header or footer), on the journal’s website landing page for the article, or search for the article title at Crossref.org.
Common Mistakes to Avoid
❌ Search Mistakes
- Typing a full sentence instead of keywords
- Relying on the first result without reading the abstract
- Forgetting to use quotation marks around phrases
- Using sources older than 5 years for fast-changing technology topics
❌ Citation Mistakes
- Copy-pasting the Google Scholar citation without checking it
- Forgetting to italicise the journal title and volume number
- Using a hyphen (-) instead of an en dash (–) for page ranges
- Omitting the DOI when one is available
- Assuming every Google Scholar result is peer reviewed